Homemade Vegan Sushi Platter
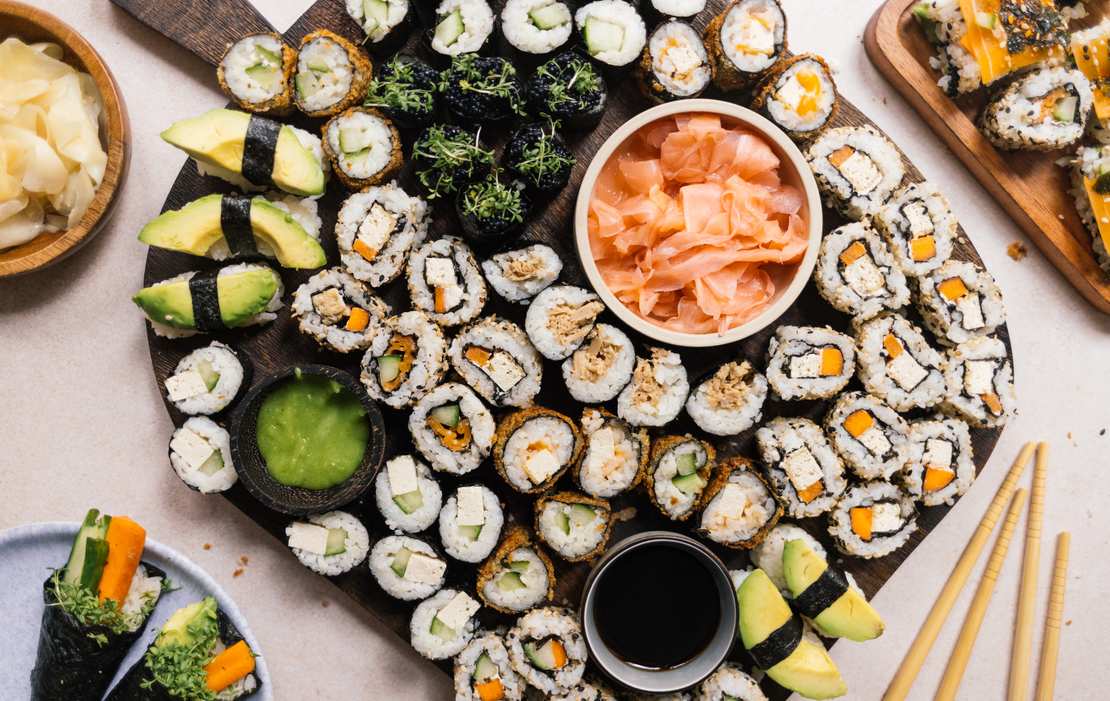
We regularly show you how to make dishes from international restaurants at home, such as pinsa, palak paneer or even a bolognese. But there is one thing for which we also go more often to the restaurant instead of making it at home: sushi. But sushi is not as complicated as you might think. And sure, for the small hunger and eight small Maki rolls with cucumber, we would also not necessarily put on the sushi rice. Therefore, we prefer to go all in today with a biiiig vegan sushi plate, which is perfect for a small party at your home. The individual components, such as sushi rice and fillings, can be perfectly divided among a larger group, and then at the table, everyone can relax and pick out the sushi shape he or she likes best – and off the rolling goes! But let's start from the beginning and work our way step by step to the sushi plate.
1. What equipment do you need for sushi at home?
There are a few essential things that you can't do without, but also some things that can make your life easier but are not absolutely necessary. Those would be:
☑ sushi mat
☑ cling film (to wrap the sushi mat)
☑ a big bowl to wash the rice
☑ a pot or rice cooker
☑ rice molds (optional, for example, for nigiri)
☑ chopsticks
☑ cutting board
☑ sharp knife
For the latter, we suggest you really use the sharpest knife in your drawer because it's not just about cutting the ingredients but also cutting the sushi rolls in the end. And trust us, there's little more disappointing in this recipe than when you crush your sushi rolls instead of cutting them, and all that rolling seems to be for naught.
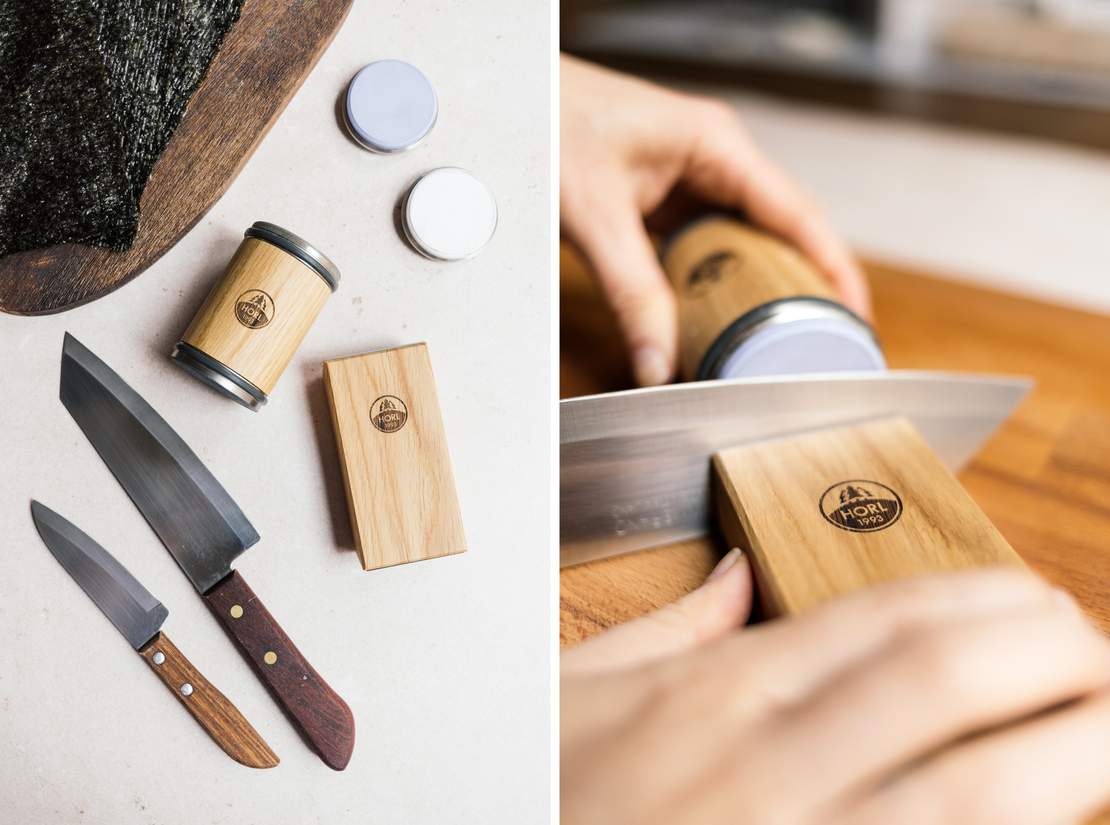
If none of your knives are really sharp, then it's probably time to sharpen again – yes, we guess how you look right now. For a long time, we also thought that sharpening knives at home would be super complicated and time-consuming, but for a few months now, we've had a roller sharpener (https://www.horl.com/us/en/rollschleifer/horl2#eiche) from Horl (https://www.horl.com/us/en/horl2/professional-sharpness-made-at-home/) in the office. And by now, almost all of us have taken it home to sharpen a round of knives there, too – in fact, it's not only very easy and quick but even fun.
The grinding set consists of a grinding block that is angled on two sides. There, you can decide whether you want to grind your knives at 15 ° or 20 °. 20 ° is suitable for all ordinary knives. 15 °, on the other hand, is perfect for particularly fine blades. The two sides are magnetic, so your knives are attracted to them, and you don't have to worry about holding the knives incorrectly and not being able to sharp them optimally. After that, you're ready to go and grab the sharpener, which has two sides: The diamond grinding disc and the ceramic honing disc. With both sides, you'll grind each side of your knife for several minutes (20 movements per side is recommended). And that's really all it is. So, you move the sharpener back and forth, and your knives get sharper each time. At the very end, all you have to do is clean the knife with a clean dish towel and wipe it down on it to remove all the abrasive particles. If you want it to be even sharper, you can use additional fine-grained corundum whetstone discs (https://www.horl.com/us/en/zubehoer/schleifsteine/premiumschaerfe-set). However, the application is the same. The grinding discs can be easily removed and replaced by turning them in and out on the sharpener.
Knife sharpened? Then you can continue.
2.What ingredients do you need for homemade sushi?
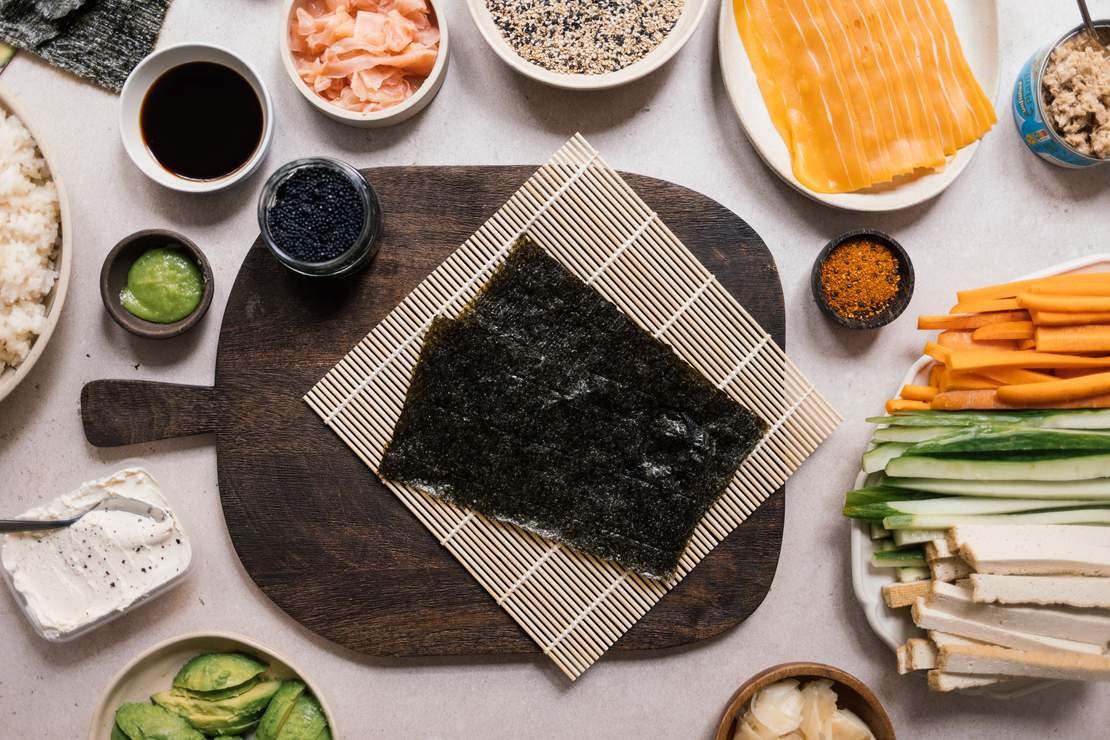
In principle, you can orient yourself to four building blocks: the sushi rice, nori leaves, fillings of your choice and the "garnishes" to the sushi.
The Sushi Rice
Sushi stands and falls with well-cooked rice. It is especially important to use short-grain sushi rice and not basmati rice, jasmine rice or similar. To ensure that the rice sticks together really well, you need to wash it thoroughly beforehand – regardless of whether you cook it on a rice stove or in a pot. So put it in a bowl with plenty of cold water and go through the rice with your hands. You'll notice right away that the water turns milky – that's the starch clinging to the rice grains that we want to get rid of. Pour off the water and cover the rice with clean water again. After that, wash the rice again and again until the water actually stays clear. Only then you should prepare your rice either in the pot or in the rice stove and add stirred sushi vinegar at the end to season the rice. The preparation is described below in the recipe. However, I didn't come up with the recipes myself, but they are from Japanese chef Shoko Kono (http://www.japanische-kochkurse.de/%C3%BCber-mich/), with whom I once had the pleasure of working – I've always made my sushi rice according to her recipe since then. She also gives cooking classes in Berlin, which I can only recommend to you.
The Nori Sheets
You've seen nori leaves before when you've eaten sushi, of course, but have you ever wondered what they actually are? They are seaweed leaves that are dried and roasted. They are soft enough to roll but still have a slight bite to them, making them tear-resistant and not directly soggy. It's the perfect consistency for sushi rolls. You can find them in Asian markets, but also more and more often in supermarkets.
Sushi Fillings
No fish = no sushi? No way! There are plenty of vegetable alternatives, which can be found in traditional sushi anyway. In addition, you can also try new fillings according to your taste. And for those who like the taste of fish, there are now vegan options that are great for vegan sushi – check out our great product test (https://www.zuckerjagdwurst.com/en/posts/vegan-shopping-guides/shopping-guide-plant-based-fish-from-german-supermarkets).
Here are just a few of our ideas for sushi filling:
☐ cucumber
☐ avocado
☐ carrot
☐ bell pepper
☐ mushrooms
☐ tofu
☐ spring onion
☐ pickled radish
☐ sweet and sour corn cobs from the jar
☐ cooked sweet potato
☐ cress
☐ vegan cream cheese
☐ vegan tuna
☐ vegan salmon
☐ vegan caviar
The right „garnishes“ for sushi
With soy sauce, wasabi and pickled ginger, you have the perfect accompaniments for your sushi platter, but did you know there are a few „sushi rules“ for them? Stirring wasabi into the soy sauce? A no-go. It's better to put it directly on the roll. Put the sushi ginger on the rolls? That is not really the point because pickled ginger is supposed to be eaten between the different rolls to neutralize the taste buds for once. Eat the sushi rolls with your hands? It is actually approved, even if chopsticks are preferred.
3. Different types and shapes of sushi
Probably most of us, when we hear the word sushi, have the classic small rolls with nori sheet in mind. But of course, there are muuuch more ways to prepare sushi. We read up on this sushi platter, watched a lot of tutorials and then tried around a bit. Today, we're going to show you six ideas that are super great for homemade sushi. In this fantastic YouTube video (https://www.youtube.com/watch?v=ZzLPUoetSHw), you can have Taka Sakaeda, a restaurant chef in New York, show and explain all of this and more in detail. Here are the sushi shapes we made for our platter. Of course, you can find the preparation below in the recipe.
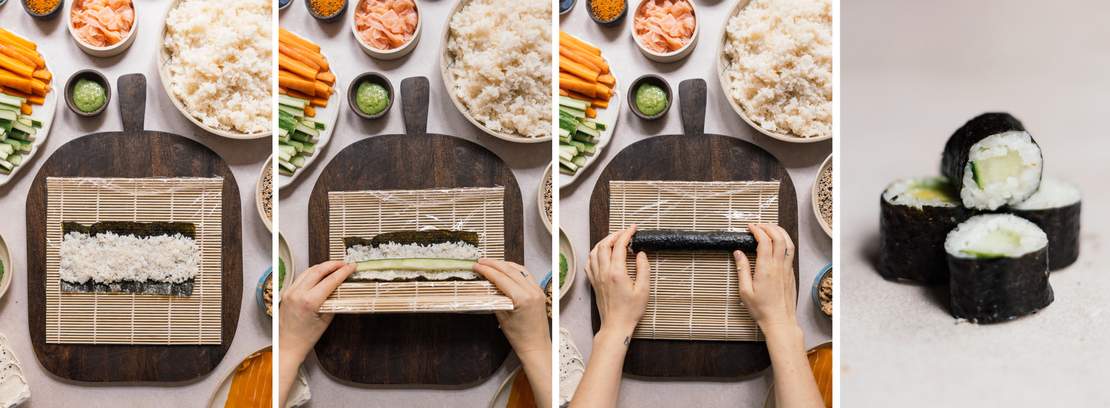
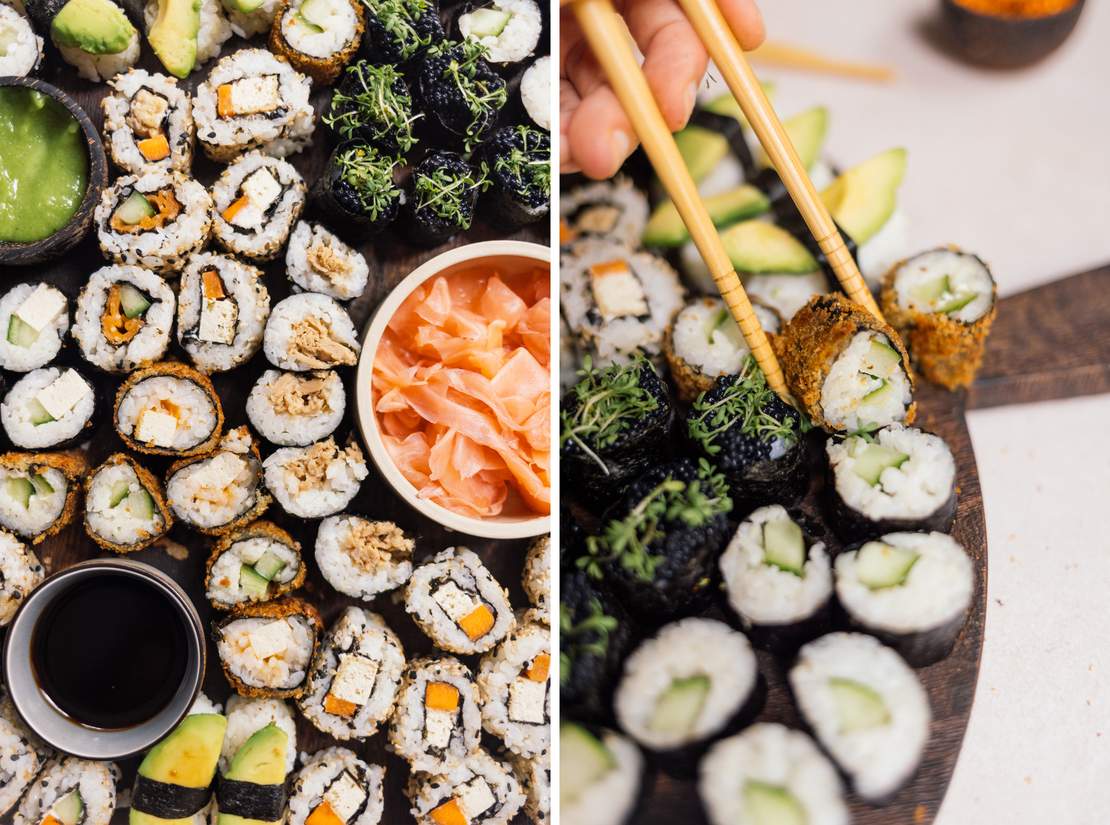
Maki: Maki is probably the best-known form of sushi, in which sushi rice and one or more fillings are rolled up in nori sheets and then cut into small pieces that end up in the mouth in one bite. Depending on the amount of filling, one can then distinguish in more detail, for example, Hosomaki (only one filling) or Futomaki (several fillings). More familiar, however, are ...
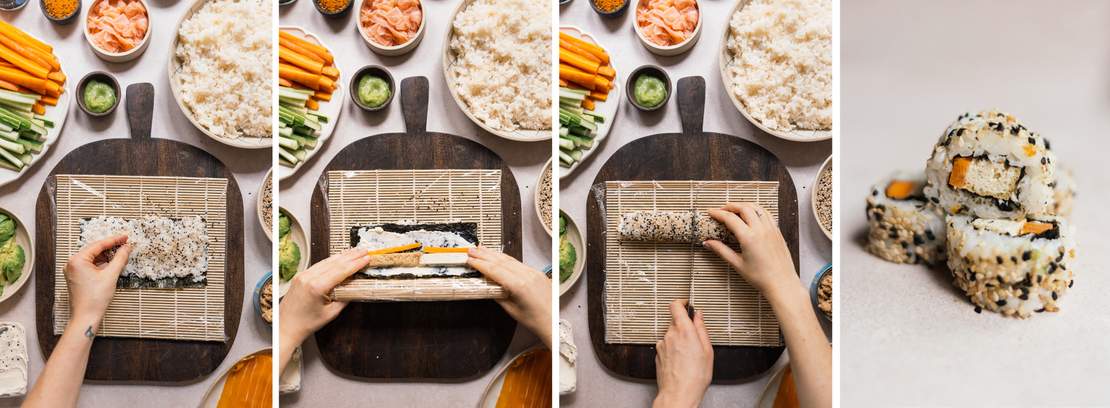
Inside-Out Rolls or Uramaki: Uramaki does not necessarily belong to the traditional but to the most popular sushi forms. In principle, the order is simply reversed: the sushi rice is on the outside, and the nori sheet is on the inside with the filling. You can often get them in restaurants with non-vegan cream cheese, but at home, you can FINALLY make the Inside Out Rolls of your dreams.
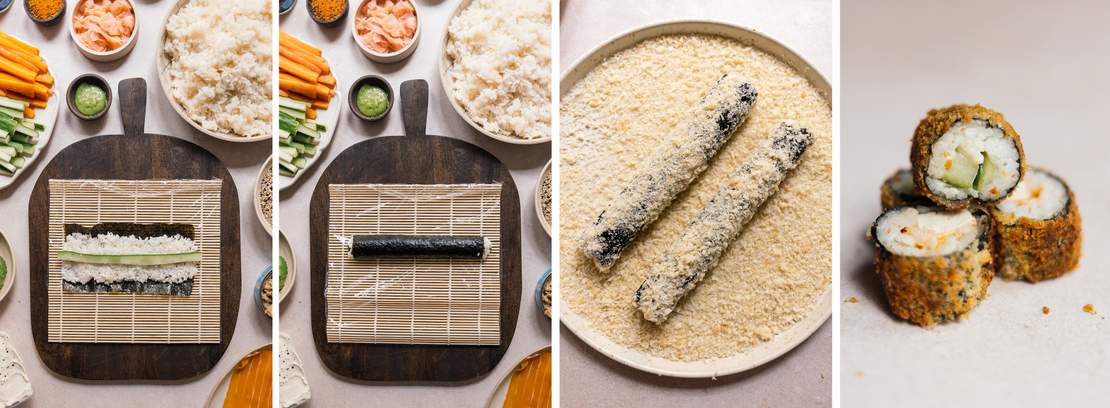
Crunchy Rolls or Age Sushi: Also anything but classic, but incredibly delicious: Both Inside Out Rolls and Maki Rolls can be coated with panko and then deep-fried so that they become crispy on the outside.
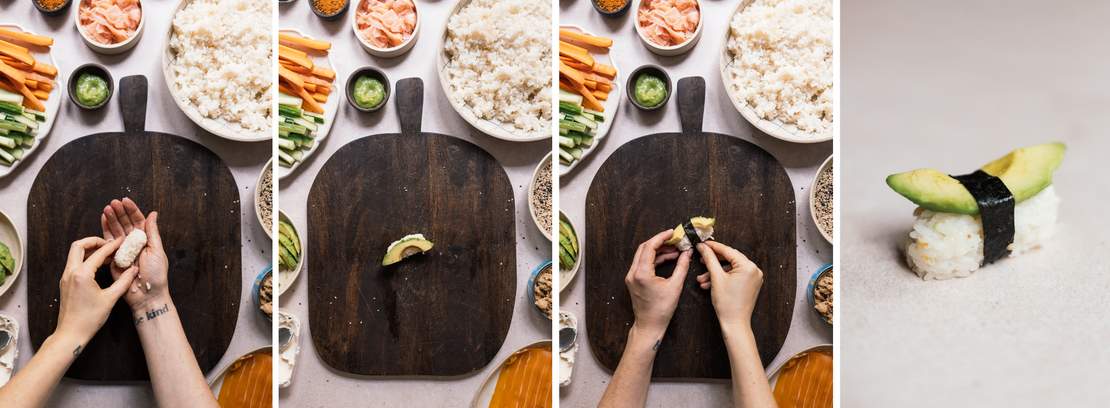
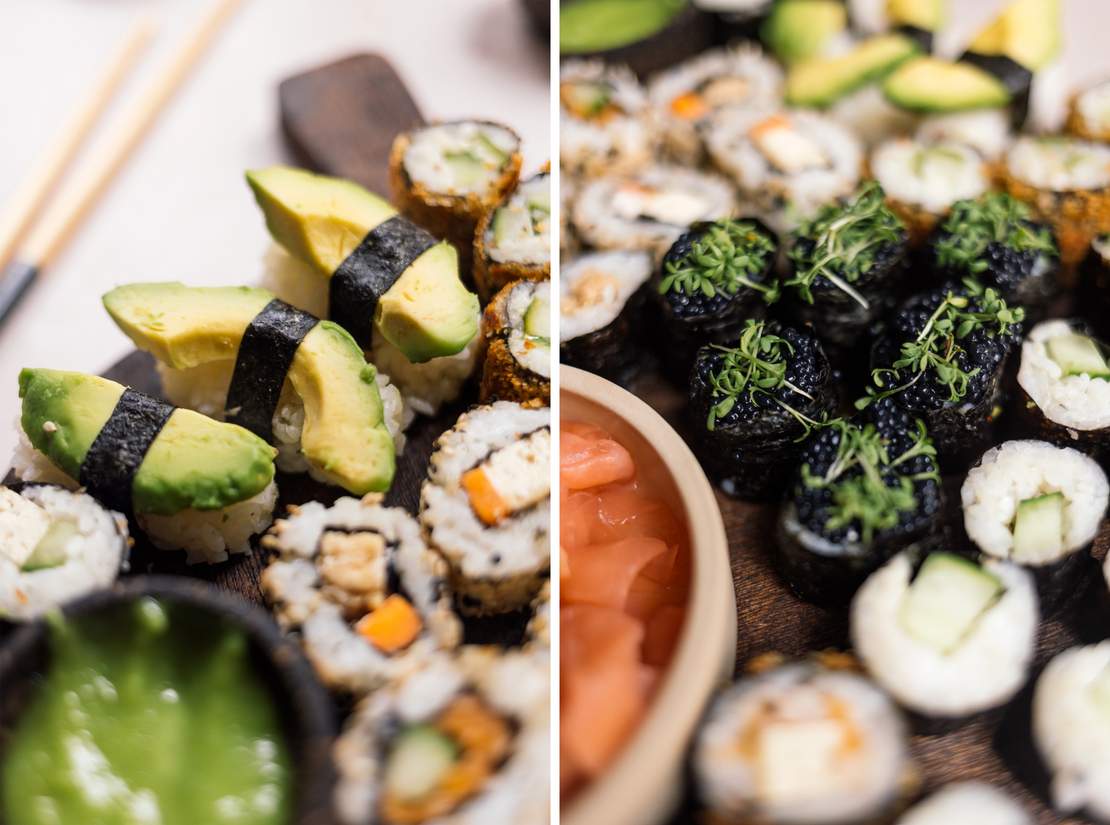
Nigiri: Nigiri is one of the most traditional forms of sushi, and you don't even need nori sheets for it. Instead, the sushi rice is formed by hand and then topped with an ingredient of your choice. For more stability, you can still wrap everything with a thin strip of nori sheet. Sounds super relaxed in itself, but shaping needs to be learned. YouTube tutorials OR a little cheat can help here as well – there are also sushi formers available for purchase that will shape the rice perfectly for you.
Temaki: Temaki is hand-rolled sushi that resembles a small bag at the end. Here, rice and several fillings can be rolled into the nori sheet. If you have trouble with the more delicate sushi rolls, you can start very well with Temaki because it is really easy for everyone.
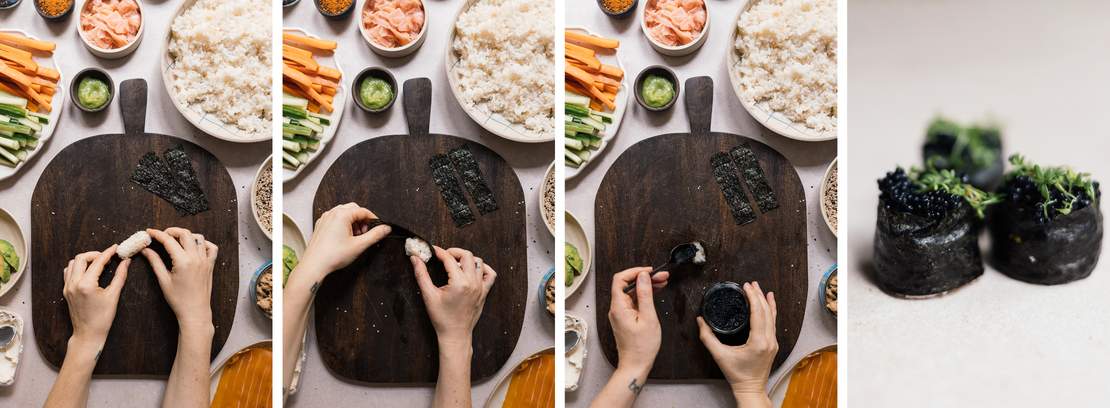
Gunkan Sushi: The name is not necessarily familiar, but for homemade sushi, it is a really nice variation which resembles a small boat at the end. The rice is wrapped with a wide strip of nori sheet but has room on top for topping with chopped ingredients or even vegan caviar.
Do you have more tips and ideas for our sushi party? Then be sure to put them in the comments below!
Homemade Vegan Sushi Platter
Ingredients
For the sushi rice:
- 600 g (1.25 Ib) sushi rice
- 800 ml (3.33 cups) water
- water for cleaning
For the sushi vinegar:
- 80 ml (0.33 cup) rice vinegar
- 1 tsp salt
- 1.5 tbsp sugar
Ideas for the filling:
- cucumber
- avocado
- carrot
- bell pepper
- mushrooms
- tofu
- spring onion
- pickled radish
- sweet and sour corn cobs from the jar
- cooked sweet potato
- cress
- vegan cream cheese
- vegan tuna
- vegan salmon
- vegan caviar
For Crunchy Rolls:
- flour
- soy flour
- water
- panko breadcrumbs
For serving:
- sushi ginger
- soy sauce
- wasabi
Instructions
Place the sushi rice in a bowl and cover with clear, cold water. Move the rice grains with your hands, mix and thereby wash until the water is milky. Rinse the water and cover the rice again with clear water. Repeat the process until the drained water is clear.
Cover the washed rice with 800 milliliters (3.33 cups) of water in a pot and let it rest and soak for about 15 minutes. Then, put the pot on the stove, boil the water and let the rice simmer on low heat for 8–10 minutes. Remove from heat and let stand for about 20 minutes with the lid closed.
In the meantime, for the sushi vinegar, mix rice vinegar with salt and sugar.
Put the cooked sushi rice into a bowl and mix it with the sushi vinegar while it is still warm. Then let it cool down completely.
Tip: If you use a rice stove, it is best to follow the preparation instructions, and you may need to adjust the amount of water. Before, you should still wash the rice thoroughly, and also the rice vinegar you can prepare as indicated and add to the still-warm rice.
While the sushi rice is cooking, prepare all the remaining ingredients and the sushi mat. Wrap the sushi mat with cling film to prevent the rice from sticking to it later. Cut nori sheets in half and trim all fillings so that they are not too thick and can fill the nori sheet lengthwise (side by side). Do not cut the vegetables too short so that the sushi roll will be more stable at the end. Remove cucumber seeds so they don't water down the sushi rolls. Fried tofu tastes wonderful in sushi; feel free to get creative here.
For the Hosomaki or Futomaki, place the shiny side of the nori sheet down on the sushi mat. Spread cooked sushi rice on top, but leave about a finger's width free on both the top and bottom. If desired, spread a thin strip of wasabi lengthwise on the center. For hosomaki, place only one filling lengthwise on rice. For futomaki, use several ingredients as filling. Then fold the nori sheet tightly from bottom to top over filling and press firmly. Then, cut into small pieces.
For Inside Out Rolls: Place the halved nori sheet on the sushi mat (the side does not matter here). Spread the cooked sushi rice on top, but leave about a finger's width of space to the bottom edge. Optionally sprinkle the rice with sesame seeds. Then flip the nori sheet over so that the rice is on the bottom. Then spread with vegan cream cheese, if desired, and place the filling in the center of the rice. Roll up tightly from bottom to top and press down well. Then, cut into small pieces.
For Crunchy Rolls: First prepare either a roll of Maki or Inside Out. Since the rice sticks well, you can roll Inside Out Rolls directly in panko breadcrumbs. Prepare three plates for the maki rolls: one with flour, a second with panko breadcrumbs and in the third plate mix soy flour and water in a ratio of 1:2. Dredge the entire maki roll first in the flour, then roll through the soy flour mixture, and finally coat completely with panko. Then fry in a pan with plenty of fat until crispy on all sides. Then cut into pieces.
For Nigiri: Shape the cooked sushi rice with your hands until it has the shape of an oval, small pillow. Then spread with a little wasabi as desired and top with ingredients of your choice. Softer ingredients such as avocado slices, tofu, or vegan salmon slices work especially well for this.
For Temaki: Place the halved nori sheet on the sushi mat with the shiny side down. First, spread the rice diagonally on the left third of the nori sheet and cover with the filling of your choice. If desired, also spread wasabi on the rice. Then place the nori sheet over the filling like an ice cream cone and roll up.
For Gunkan Maki: Shape the sushi rice into small oval cushions with your hands, just like for the Nigiri. Then cut the nori sheet into wide strips, which should be long enough to wrap once around the sushi rice. Place the strips around the rice so that the shiny side is facing out. Then cover the top side as desired.
